Now the animation playback control button in the animator toolbar is available. Click and play to see the animation of the computer's real-time calculation in the interface. Simple? At this point in the animation manager you can see an ed-1-1 animation under the ed branch, where we can manage the generated animation, right click on the generated animation, there will be several options: The path is to play the animation once; the edit path is to modify the path, insert or delete the path point. Select the path point you want to edit in the Move along path setting bar, and then select the type you want to modify in Action: 1. Update current path point--Update the path point with the current position parameter of the object. 2. Delete the current path point -- delete the current path point. 3. Insert before the current path point -- Insert a new path point before the current position of the object. 4. Insert after the current path point -- insert a new path point after the current position of the object; as for deleting the path, I don't need to explain it. In addition, there is an option in the animator menu -- delete all paths. Be careful when using it.
You can use the above method to bypass the class. If the design requirement is to re-expand when the manipulator slides to the end of the track, then ed needs three path points: the track start point, the track end point, and the expanded limit position. This is not the same as the animation above. The robot does not expand while sliding, but waits until it stops at the end of the track.
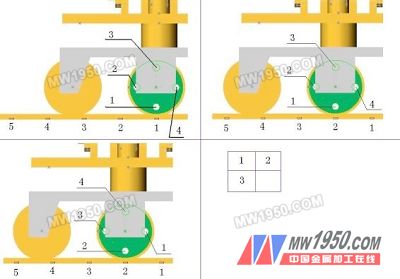
The following introduces the animation of rolling parts. The animator does not have the function of setting the scrolling. I have explored the experience of using the path point to achieve scrolling in actual use. I will come up with everyone to learn from the typical parts of the robot base--- For the sake of the wheel, first I made a row of sleepers on the outside of the track. The spacing of the sleepers is about a quarter of the circumference of the wheel (this can be precisely controlled by calculation). It is used to reference the rolling length of the wheel. After five sleepers, each hole has a hole aligned with it, and the last hole is aligned with the No. 5 sleeper, so this process requires four path points and then drags the wheel to the start of the track. For convenience of explanation, I numbered the five sleepers to 12345. Correspondingly, the hole on the wheel surface is also numbered as 1234. Now align the No. 1 hole with the No. 1 sleeper, add the first path point (the details of how to add the path point are not detailed here), and then locate the No. 1 hole. Above the No. 2 sleeper, in order to avoid turning the wheel while dragging, you can position the No. 1 hole by dragging the base. Now, in order to show the rolling of the wheel, you should turn the No. 2 hole to the position of the No. 2 sleeper. Set the base to fixed, then turn the wheel to align the No. 2 hole with the No. 2 sleeper, and add a second path point to release the fixed position of the base. By analogy, add path points to holes 3 and 4, and complete the animation of the wheel turning one week. Now the 1st hole and the 5th sleeper are aligned. At this time, there is no need to add a path point, because the wheel is back to the initial state, we You can use the macro action to continue to set the second week of scrolling animation of the wheel. The operation of the macro is not elaborated here. There are a few questions to explain: 1, due to the functional limitations of the animator, the positioning of the above production process is not very accurate, basically at the level of visual inspection, this method may not be applicable if you want to make accurate scrolling animation of parts. 2. Before setting this animation, you have used the fit to constrain the wheel and track to "tangent". 3, the sleeper is temporarily added as a reference, after setting the animation can be deleted. The above scrolling animation is just my personal experience, maybe you have a better way, welcome to communicate with me.
Previous page next page
Led Lighting For Indoor Growing are ideal for all phases of plant growth and works well with water solution culture and soil culture.
Can be used in house garden, pot culture, garden, sowing, breeding, farm, flower exhibition, bonsai, garden, greenhouse, sowing, breeding, farm, greenhouse cultivation, water soluble breeding, greenhouse cultivation, pipeline cultivation and so on.
More details on LED Grow Light bars, please contact us directly and warmly welcome to visit our company.
* Full spectrum or customized spectrum are available to meet customers needs. High efficacy didoes to promote yields and improve quality of plants.
* UL listed high quality dimmable drivers, ensure stable performance and longer lifespan. With dimming knob to adjust the light intensity to meet plants need at different stages.
* The power input is from 100 to 277VAC, power factor is more than 0.98. Photo efficacy is based on request, higher up to 2.8 umol/j.
* Foldable structure design, safety and convenient for transportation and installation.
* With Aluminum heat sink material can get fast heat conduction, better at heat dissipation.
* IP65 with 3-5 years warranty, it can last 50,000 hours, longer than many LED Grow Lights on the market, save more cost.
Foldable LED Grow Light,720w,led grow lamps,samsung
Shenzhen Phlizon Technology Co.,Ltd. , https://www.philizon.com