Main installation method and size
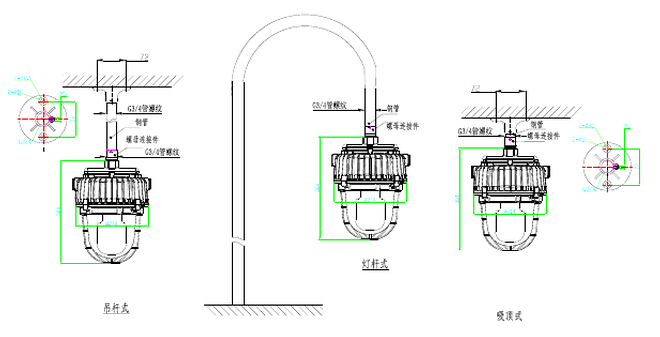
installation method
Light pole installation
Material used: G3/4 pipe thread steel pipe
Installation method: Install the luminaire on the G3/4 pipe thread steel pipe, vertically downwards.
Material used: G3/4 pipe thread steel, boom type converter
installation method
The boom-type converter is fixed in the desired installation position. The steel pipe is mounted on the boom-type converter and the lamp is installed on the G3/4 pipe-threaded steel pipe, and is vertically downward.
Boom installation / ceiling installation
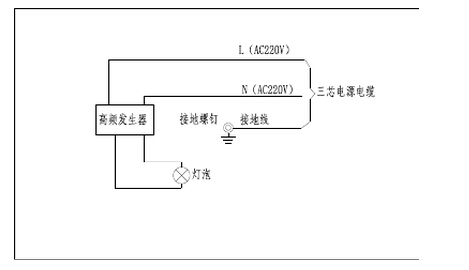
Wiring method
1. Wiring and schematic:
Explanation:
1). The external three-core power cable (L, N, grounding cable) is introduced into the wiring cavity through the compression nut, and is respectively connected to the corresponding L, N and grounding points.
2. Wiring method:
1. According to the above figure, select the appropriate installation method.
2, determine the lighting installation location, cloth well, and ready for the corresponding length of the three-core cable wear well in the steel pipe. The cable shall be exposed to approximately 90 mm of steel pipe, and the cable end of the cable shall be stripped of 40 mm to expose the internal wires.
3. Pass the cable through the nut connector, the washer, the seal ring, and the inside of the top cover. Hold the wrench on the nut connector with the spanner and tighten the nut connector to ensure the inside of the top cover. The cable seal is fully compressed. After tightening, the nut connector can only expose one or two buckles on the top cover. Then connect the steel pipe with the nut connector, tighten the pipe wrench with the wrench on the nut connector, and tighten the steel pipe with the M4 screw on the nut connector.
4. Use a hex wrench to loosen the screw on the upper side of the top cover, open the top cover, open the top cover, and insert the three-core cable into the lamp cavity to perform wiring. Then tighten the wire screw, close the top cover, and tighten the top screw.
Precautions:
1, installation and maintenance of lamps must be powered off, refer to the wiring diagram
2. Non-professionals are not allowed to install cables and disassemble lamps.
3, the lamp should be safely grounded
For the Peristaltic Pump Tubing, We have different material choices for your various liquids. The standard tube is silicon tubing which conforms to the FDA certificate. Except that we also offer the Saint-Gobain imported tubing, Eg.: Norprene®A-60-F/Norprene®chemical /Pharmed® BPT... Which suitable for various chemical-based liquid.
Suitable for various industrial applications.
Norprene Chemical Tube,Peristaltic Pump Transfer Tube,Peristaltic Pump Hose,Peristaltic Pump Tube
Baoding Chuangrui Precision Pump Co., Ltd. , https://www.crprecisionpumps.com