Home decoration is a very important thing, because the quality of home decoration is directly related to the comfort of living in the future, and ceiling decoration is a more important piece of decoration, in order to do a good job of home ceiling decoration, as the owner of You must master some relevant construction techniques for ceiling decoration. Therefore, the following Xiaobian introduces the construction technology of wooden keel ceiling.
Wooden keel ceiling construction process, put the line
Step 1: Determine the elevation line. Start with the floor reference line. Measure the ceiling height (plus the thickness of the floor plate) on the pedestal (column) surface according to the design requirements, and draw the quotient line at this point. (As the ceiling line of the ceiling keel). Can be measured with a level gauge or "water column method".
Step 2: Determine the shape line: According to the design requirements, draw the specific position line of the shape on the top or on the surface.
Wooden keel ceiling construction process II, wood keel assembly
Before the wooden keel is hoisted, it should be assembled on the building (ground) surface. The assembled area is generally no more than 10 linings. The method of assembling the keel often uses a bite-and-half meditation method. Its specific approach: slotted in the keel, the slot and the slot to be assembled between the slot, the slot glue and nail fixed.
Wooden keel ceiling construction process III. Installation hanging point
The installation of hanging points, hanging points commonly used expansion bolts, embedded parts, etc., the reinforcement can be used steel, angle steel or square wood, hanging points and hanging bars can be welded, tied, hooked, bolts or screws and other means of connection.
Wood keel ceiling construction process Fourth, fixed along the wall keel with a percussion drill in the top of the perforation line, the hole lined cork wedge, the wall along the keel nailed on the wooden wedge.
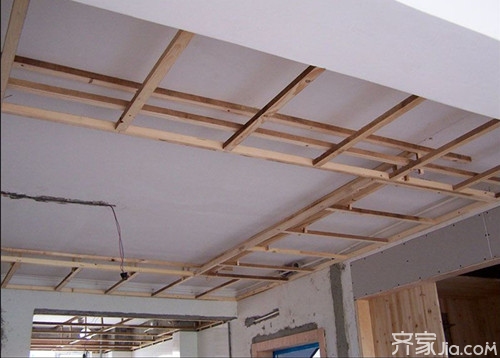
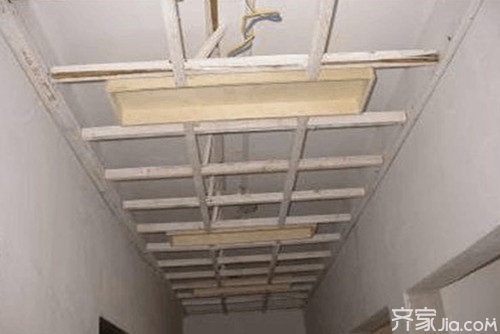
Wooden keel ceiling construction process 5, keel lifting and fixing
With the wire, the assembled wooden keel is hung straight above the elevation line, temporarily fixed, and a number of parallel lines and diagonal crossing lines are drawn along the ceiling elevation line using a bar line rope or a nylon line, which prevails, and the keel is slowly taken. Move to level with the line, and then connect it with the bar. In the same way, the stacked keel is fixed and the upper and lower keels are connected.
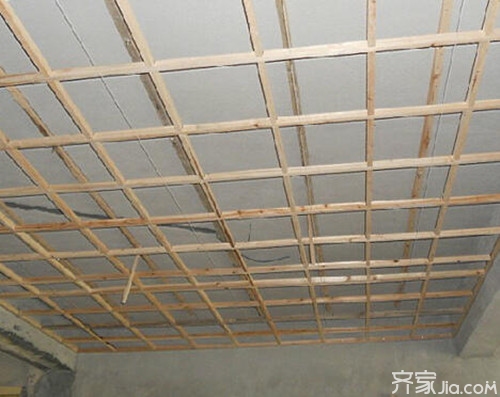
Wooden keel ceiling construction process six, keel leveling, arching
After the entire keel is connected, a diagonal cross line is pulled out from the underside of the ceiling to check the flatness of the suspended ceiling. When the area is large, the arch can be arched. The height of the arch is about 1/200 to 1/3000 of the span of the room.
Wood keel ceiling construction process 7, install paper gypsum board
Use a self-tapping screw to lay the paper stone slab on the keel. When installing, pay attention to the following: The long side of the gypsum board must be perpendicular to the secondary keel, so that the end edge falls on the central part of the secondary keel. The gypsum board should be installed in a free state. When it is fixed, it should be fixed from the center to the four sides of the board. A gap of 6mm should be left between the gypsum board and the grinding surface. The distance between the screw and the edge of the board is preferably 10-15mm, and the nail pitch of the self-tapping screw is not more than 200mm (150-170mm optional). After the board is nailed, use gypsum putty to fill the board seams and nail holes, and use the seam tape or glass fiber grid tape to join the boards with the reinforcing material. All the joints should be caulked in the previous one. Dry it before proceeding.
Editor's summary: The construction technology of wooden keel ceiling is introduced here, and I hope to help everyone. If you want to know more related information, you can pay attention to this website information.
Keel installation
The main uses of carbide burrs:
Finish machining of various metal mold cavities; craft engraving of various metals and non-metals, engraving of craft gifts; cleaning up flash and welds of casting, forging, and welding parts, such as machine foundries, shipyards
Etc.; chamfering and rounding of various mechanical parts and processing of grooves, finishing of the inner hole surface of mechanical parts, etc.
Carbide Burr,Tungsten Carbide Cutting Tool,Double Machine Tool,Grinding Stone
Behappy Crafts (suzhou)Co.,Ltd , https://www.haoyuebehappy.com